Speisekarte


Die richtige Solarlösung für Wohnwagen: 12 V und 240 V
Sie planen eine autarke Reise mit Ihrem Wohnwagen? Dann benötigen Sie ausreichend Strom für Ihre Tour, und die beste Möglichkeit, dies zu erreichen, ist die Nutzung von Solarenergie.
Die Einrichtung kann eine der komplexesten und schwierigsten Aufgaben sein, die Sie vor Ihrer Reise erledigen müssen. Keine Sorge, wir helfen Ihnen!
Wie viel Solarenergie benötigen Sie?
Bevor Sie sich an einen Solarenergieanbieter wenden, müssen Sie zunächst Ihren Energiebedarf für Ihren Wohnwagen ermitteln. Mehrere Faktoren beeinflussen die von den Solarmodulen erzeugte Energiemenge:
- Jahreszeit
- Wetter
- Standort
- Art des Ladereglers
Um die benötigte Menge zu ermitteln, betrachten wir die Komponenten einer Solaranlage für einen Wohnwagen und die verfügbaren Optionen.
Ihre grundlegende Solaranlagenkonfiguration für Ihren Wohnwagen
Es gibt vier Hauptkomponenten einer Solaranlage, die Sie vor der Installation kennen sollten:
- Solarpaneele
- Regler
- Batterie
- Wechselrichter
Die verschiedenen Arten von Solarmodulen für Wohnwagen
Die drei Haupttypen von Solarmodulen für Wohnwagen
- Glassolarpaneele : Glassolarpaneele sind heutzutage die gängigsten und etabliertesten Solarpaneele für Wohnwagen. Sie bestehen aus einem stabilen Rahmen, der auf dem Dach befestigt wird. Sie werden sowohl für private als auch für gewerbliche Installationen verwendet. Allerdings können sie auf dem Dach etwas anfällig sein. Daher ist es ratsam, die Vor- und Nachteile sorgfältig abzuwägen, bevor Sie diese Art von Solarpaneel auf dem Dach Ihres Wohnwagens installieren lassen.
- Flexible Solarmodule : Diese sind leicht und halbflexibel, wodurch sie etwas teurer sind. Sie können ohne Montagehalterungen direkt mit Silikon auf ein gewölbtes Dach geklebt werden.
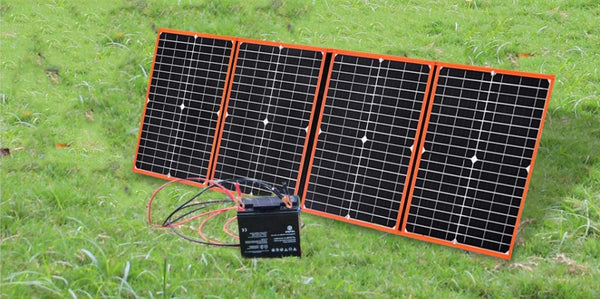
- Faltbare Solarpaneele : Diese Art von Solarpaneelen erfreut sich in der Caravan-Szene zunehmender Beliebtheit. Der Grund dafür ist ihre einfache Handhabung: Sie lassen sich leicht transportieren und im Wohnwagen verstauen – eine Montage ist nicht erforderlich. Man kann sie einfach anheben und im Wohnwagen positionieren, um die Sonneneinstrahlung optimal zu nutzen. Dank ihrer Flexibilität lässt sich die Sonnenenergie maximal ausschöpfen.
Xinpuguang verfügt über einen umfassenden Marktplatz , der Ihnen möglicherweise beim Kauf der passenden Solarpaneele für Ihren Wohnwagen behilflich sein kann.
12-V-Batterie

12-V-Tiefzyklusbatterien gelten als die beliebteste Option für Wohnwagen und liefern ausreichend Strom für den Betrieb gängiger 12-V-Geräte und anderer elektrischer Anlagen. Zudem sind sie langfristig deutlich günstiger. 12-V-Batterien müssen in der Regel alle fünf Jahre ausgetauscht werden.
Im Prinzip benötigen Sie Solarmodule mit einer Nennspannung von 12 V und einer Leistung von bis zu 200 Watt. Ein 200-Watt-Modul kann unter idealen Wetterbedingungen etwa 60 Amperestunden pro Tag erzeugen. Damit lässt sich eine 100-Ah-Batterie in fünf bis acht Stunden aufladen. Beachten Sie, dass Ihre Batterie eine Mindestspannung benötigt, um Ihre Geräte zu betreiben. Das bedeutet, dass eine durchschnittliche Deep-Cycle-Batterie mindestens 50 % Ladung benötigt, um Ihre Geräte zu betreiben.
Wie viele Solarmodule benötigen Sie, um Ihre 12-V-Batterie zu laden? Ein einzelnes 200-Watt-Modul kann eine 12-V-Batterie innerhalb eines Tages aufladen. Sie können zwar auch kleinere Solarmodule verwenden, die Ladezeit verlängert sich dadurch jedoch. Alternativ können Sie Ihre Batterie auch über das 240-V-Netz aufladen. Wenn Sie mit Ihrer 12-V-Batterie Geräte betreiben möchten, die für 240 V ausgelegt sind, benötigen Sie einen Wechselrichter.
Betrieb von 240-V-Geräten
Wenn Sie die ganze Zeit auf einem Campingplatz stehen und an das Stromnetz angeschlossen sind, können Sie alle Geräte in Ihrem Wohnwagen problemlos betreiben. Wahrscheinlich werden Sie aber die meiste Zeit unterwegs sein und verschiedene Orte erkunden, sodass Sie nicht an das Stromnetz angeschlossen sind. Viele Geräte, wie z. B. Klimaanlagen, benötigen 240 V – eine 12-V-Batterie ohne Wechselrichter reicht also nicht aus, um diese Geräte zu betreiben.
Die Lösung besteht darin, einen 12-V-zu-240-V-Wechselrichter aufzustellen, der den 12-V-Gleichstrom von der Batterie Ihres Wohnwagens in 240-V-Wechselstrom umwandelt.
Ein einfacher Wechselrichter hat üblicherweise eine Leistung von etwa 100 Watt, kann aber bis zu 6.000 Watt leisten. Bedenken Sie jedoch, dass ein leistungsstarker Wechselrichter nicht automatisch bedeutet, dass Sie alle gewünschten Geräte betreiben können. So funktioniert das nämlich nicht!
Wenn Sie auf dem Markt nach Wechselrichtern suchen, werden Sie sehr günstige Modelle finden. An den günstigeren Varianten ist nichts auszusetzen, aber sie eignen sich nicht für den Betrieb größerer Geräte.
Wenn Sie tagelang, wochenlang oder sogar monatelang unterwegs sind, benötigen Sie einen hochwertigen Wechselrichter mit reiner Sinuswelle (einer kontinuierlichen, gleichmäßigen Schwingung). Sicher, er ist in der Anschaffung etwas teurer, spart Ihnen aber langfristig viel Geld. Außerdem schützt er Ihre Elektronik und Haushaltsgeräte.
Wie viel Energie benötigt mein Wohnwagen?
Eine typische 12-V-Batterie liefert 100 Ah. Das bedeutet, dass die Batterie in der Lage sein sollte, 1 Ampere pro 100 Stunden zu liefern (oder 2 Ampere für 50 Stunden, 5 Ampere für 20 Stunden usw.).
Die folgende Tabelle gibt Ihnen einen groben Überblick über den Energieverbrauch gängiger Haushaltsgeräte innerhalb von 24 Stunden:
12-Volt-Batteriesystem ohne Wechselrichter
|
Gerät |
Energieverbrauch |
|
LED-Leuchten und Batterieüberwachungsgeräte |
Weniger als 0,5 Ampere pro Stunde |
|
Überwachung von Wasserpumpen und Tankfüllständen |
Weniger als 0,5 Ampere pro Stunde |
|
Kleiner Kühlschrank |
1-3 Ampere pro Stunde |
|
Großer Kühlschrank |
3 – 5 Ampere pro Stunde |
|
Kleine elektronische Geräte (kleiner Fernseher, Laptop, Musikplayer usw.) |
Weniger als 0,5 Ampere pro Stunde |
|
Aufladen von Mobilgeräten |
Weniger als 0,5 Ampere pro Stunde |
240-V-Konfiguration
|
Gerät |
Energieverbrauch |
|
Klimaanlage und Heizung |
60 Ampere pro Stunde |
|
Waschmaschine |
20 – 50 Ampere pro Stunde |
|
Mikrowellen, Wasserkocher, elektrische Bratpfannen, Haartrockner |
20 – 50 Ampere pro Stunde |
Wir empfehlen Ihnen dringend, sich mit einem Spezialisten für Wohnwagenbatterien in Verbindung zu setzen, der Ihre Energiebedürfnisse berücksichtigt und Ihnen eine Batterie-/Solaranlage empfiehlt.
Die Installation
Wie installiert man also eine 12-V- oder 240-V-Solaranlage auf seinem Wohnwagen? Am einfachsten lässt sich eine Solaranlage mit einem fertigen Solarmodul-Set installieren. Ein solches Set enthält alle notwendigen Teile.
Ein typisches Solarmodul-Set enthält mindestens zwei Solarmodule , einen Laderegler, Montagehalterungen zur Befestigung der Module auf dem Wohnwagendach, Kabel, Sicherungen und Stecker. Die meisten Solarmodul-Sets werden heutzutage ohne Batterie und Wechselrichter geliefert – diese müssen separat erworben werden.
Andererseits können Sie auch alle Komponenten, die Sie für Ihre 12-V-Solaranlage für Ihren Wohnwagen benötigen, einzeln kaufen, insbesondere wenn Sie bestimmte Marken im Sinn haben.
Sind Sie nun bereit für Ihre Selbstinstallation?
Egal ob Sie eine 12-V- oder eine 240-V-Anlage installieren, der Vorgang ist im Prinzip derselbe.
1. Bereiten Sie Ihr Werkzeug vor.
Wenn Sie bereit sind, Solarzellen in Ihrem Wohnwagen zu installieren, benötigen Sie lediglich ein durchschnittliches Heimwerker-Set, das Folgendes enthält:
- Schraubendreher
- Bohrmaschine (mit zwei Bohrern)
- Abisolierzange
- Snips
- Kartuschenpistole
- Isolierband
2. Kabeltrasse planen
Der ideale Standort für Ihre Solarpaneele ist das Dach Ihres Wohnwagens. Sie sollten jedoch den optimalen Platz auf dem Dach sorgfältig auswählen. Berücksichtigen Sie dabei die Kabelführung und den Einbauort Ihrer 12-V- oder 240-V-Batterie im Wohnwagen.
Sie möchten die Kabelführung im Fahrzeuginneren so weit wie möglich minimieren. Der beste Standort ist dort, wo Sie leicht auf einen oberen Stauraum und einen vertikalen Kabelkanal zugreifen können.
Bedenken Sie, dass die besten Kabelführungen nicht immer leicht zu finden sind und Sie möglicherweise einige Verkleidungsteile entfernen müssen, um Platz zu schaffen. Viele nutzen den 12-V-Stauraum, da dort die Kabelkanäle bereits zum Boden verlaufen. Außerdem verfügen die meisten Wohnwagen über ein bis zwei solcher Stauräume für die werkseitig verlegten Kabel, und Sie gewinnen möglicherweise sogar noch zusätzlichen Platz für weitere Kabel.
Planen Sie die Route, die Kreuzungen, die Anschlüsse und die Sicherungspositionen sorgfältig. Es empfiehlt sich, vor der Installation Ihrer Solarmodule einen Schaltplan anzufertigen. Dadurch lassen sich Risiken und Fehler minimieren.
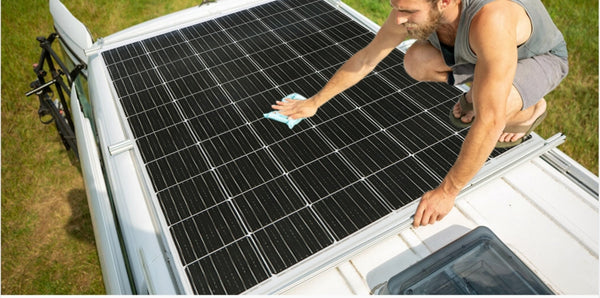
3. Das Dach des Wohnwagens reinigen
Sobald alles vorbereitet ist, stellen Sie sicher, dass das Dach des Wohnwagens sauber ist. Sie können es vor der Installation der Solarpaneele mit Wasser und Seife reinigen.
5. Installationszeit!
Legen Sie die Paneele auf eine ebene Fläche und markieren Sie die Stellen, an denen Sie den Klebstoff auftragen möchten. Tragen Sie den Klebstoff großzügig auf die markierten Stellen auf und achten Sie auf die Ausrichtung der Paneele, bevor Sie sie auf dem Dach anbringen.
Wenn Sie mit der Position zufrieden sind, entfernen Sie überschüssiges Dichtmittel mit einem Papiertuch und achten Sie auf eine gleichmäßige Abdichtung.
Sobald die Platte befestigt ist, kann es losgehen mit dem Bohren. Am besten lässt man sich beim Bohren von jemandem im Wohnwagen ein Stück Holz oder Ähnliches festhalten. So werden Beschädigungen an den Deckenplatten vermieden. Bohren Sie gleichmäßig und langsam.
Nachdem das Loch im Dach des Wohnwagens ist, muss das Kabel hindurchgeführt werden. Führen Sie das Kabel durch das Loch in den Wohnwagen ein. Dichten Sie die Kabeleinführung ab und begeben Sie sich dann in den Wohnwagen.
6. Bauen Sie den Regler ein.
Der erste Teil der Installation ist abgeschlossen; jetzt ist es an der Zeit, den Solarladeregler einzubauen. Sobald der Regler installiert ist, schneiden Sie das Kabel vom Solarpanel zum Regler ab und verlegen es zur Batterie. Der Regler verhindert das Überladen der Batterien. Sobald die Batterien voll sind, schaltet sich der Solarladeregler automatisch ab.
7. Alles miteinander verbinden
Sie haben die Sicherung bereits eingesetzt, jetzt ist es an der Zeit, die Batterie anzuschließen. Führen Sie die Kabel in den Batteriekasten ein, isolieren Sie die Enden ab und verbinden Sie sie mit den Batteriepolen.
Für weitere Informationen folgen Sie bitte Offizielle Website von XINPUGUANG :
Facebook: Xinpuguang Solar Panel Instagram: xinpuguangsolar
Pinterest: XinpuguangSolarPanels
Startseite: https://xinpuguangsolar.com
E-Mail-Adresse: Philip@isolarparts.com
- Die Auswahl einer Auswahl führt zu einer vollständigen Seitenaktualisierung.